I’ve been making museum mounts for over ten years. Most of that time I’ve spent working at the Beaty Biodiversity Museum, the remainder at the Museum of Anthropology. Since I often get asked what a mountmaker is, I’ll describe it!
I custom fabricate all kinds of supports for specimens or objects on display. For example, if a creature is in a cabinet, it might need a metal armature to stabilize and anchor it into place. Often I use brass for this, but steel also works very well for large specimens like sheep or whales, or objects like totem poles or stone work.
When a display is in a drawer, the most common method is to create a tray using archival mat board, into which is laid a piece of closed cell foam. Depth of the tray and foam depends on the object’s size and weight, the angle of viewing and structural support needed by the object, and stability during the movement of the drawer. While I’ve made hundreds of tray mounts, each one is unique to each specimen or object, because no two are exact copies of each other.
Mountmaking requires attention to detail, technical and creative skills, spatial thinking, how to properly handle and assess specimens or objects, and how to best present them. Knowledge of preventive conservation is a huge asset. Knowing how to work with metals, woods, plastics, paint, paper, adhesives, chemical patinas and many types of tools are all part of this niche trade. One also has to make the mount invisible or visually integrated, while presenting the specimen well. A mountmaker’s best work is the stuff a viewer never notices, and, as I like to say, “I innovate inside the box.”
~~~
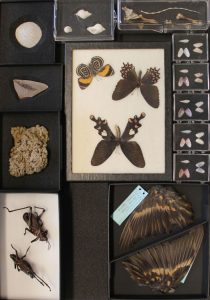
When I was first presented with a pile of 28 specimens by Beaty’s Education and Outreach director in 2015 and told to fit them all in a plastic box 18” long x 12.5” wide x 11.5” deep, it was an interesting challenge. All these animals, plants and fossils, along with 28 specimen flash cards and a teacher’s manual, needed to be mounted in trays and stacked in the box in a way that kept them safe and stable during travel, handling and repacking. This was the first Beaty Box of many to follow.
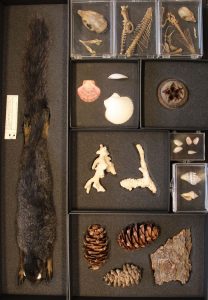
What are Beaty Boxes? you may ask. They are outreach kits put together to showcase various specimens from the Beaty Museum’s collections. Plastic boxes, similar to reusable moving boxes, they contain anywhere from 25 to 50 specimens, often selected around the theme of an ecosystem. Each Beaty Box has large mat board trays that hold smaller specimen tray mounts inside them. Each plastic box slopes outward from its bottom, so the smallest large tray sits at the bottom of the box and the larger trays stack one atop the other. Each large tray has a photo adhesed to its bottom showing where each specimen mount should go. Without this, even I wouldn’t be able to remember where to put each smaller mount!

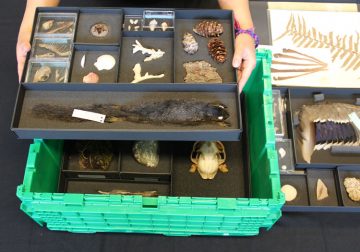
Where to start? Measuring the inside of the box’s bottom was the first step. Heavy or large specimens are best on the bottom, and are placed to help overall weight balance. (Obviously, lighter specimens are better higher up in the box.) Once I have the internal measurements, I create that space on my work table with rulers as borders to figure out who would fit the bottom tray best.
While making all the tray mounts, I also have to keep in mind the thickness of the matboard’s walls (1/16” or 1.6 mm, which equals 1/8” or 3.18mm for two walls) and add that to each mount’s size in order to make everything fit together like a puzzle. It’s rather like playing Tetris in real life.
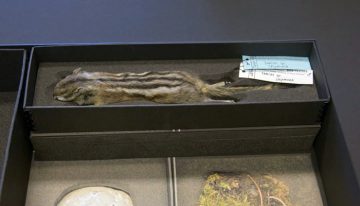
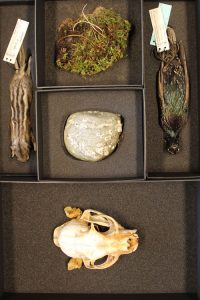
After much arranging of various specimens around the rock, I ended up starting with the rock fossil, bobcat skull, chipmunk, starling and moss. These all fit well together and were sturdy enough to go on the bottom with the rock near the centre. Each of the three following levels for the large trays was figured out one at a time, but always with the consideration of how tall the plastic box was inside.
Everything, including the large trays, needed to fit without moving or being squished when the plastic box’s lid was closed. Matching tray heights with each specimen was very important, and sometimes included stacking a single tray on top of a level of other small ones, as with the mallard wing in Tray 2.

In order to remember where each specimen went, I photographed the layout for each tray, demarcating mount “walls” with bamboo skewers, which happen to be as thick as two tray walls side-by-side. Photos also really helped if I wasn’t sure about a large tray’s layout. Being able to visually compare two or three different layouts is extremely helpful!
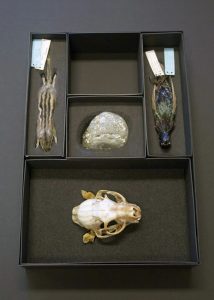

Mat board comes in sheets of 32 x 40 inches. It takes anywhere from 3 to 4.5 mat sheets to cut all the trays for a Beaty Box, depending on the size of the plastic box and number of specimens. To protect them, each tray mount must have walls a minimum of 1/8” (3.18mm) or more clearance above each specimen’s tallest point. It’s also vital, as I learned while making more Beaty Boxes later, that all the tray mounts need to create a mostly level surface with their larger tray’s walls to help support the weight above them.
This may all seem like very tedious technical details, but it’s all hugely important to creating the beauty and magic that Beaty Boxes bring to children and other people who borrow them from the museum. In order to keep each specimen protected over time, their mounts need to fit them well, be easily handled, and maintained over time. A mount made for any plant or creature is there for people to handle the mount, rather than what the mount holds. I can replace a broken mount fairly easily, but I cannot replace a broken specimen. Each Beaty Box I’ve created mounts for has been a unique and wonderful adventure. I learn a lot with each Box I make, and I always enjoy creating mounts for the Beaty’s wide-ranging collections.